Learn about the foot and shoe anatomy behind proper shoe fit, how shoe fit functional testing works, and how to choose appropriate footwear based on foot type, pronation, and gait. Discover the 9 tests essential to shoe fit and the 9 steps to a proper shoe fit.
Struggling to Find Proper Shoe Fit? Here's What You Should Know About Foot Anatomy, Fit Testing, and Choosing the Right Footwear
Choosing the right shoe goes beyond picking a size. Proper shoe fit starts with understanding foot anatomy, foot type, and gait.
This guide summarizes the National Shoe Fit Program in three parts: foot and shoe anatomy and function, shoe fit functional testing, and choosing appropriate footwear for the professional.
If you're looking for the right shoe, it's important to understand how the foot and lower limb function, because many of the findings below change the type of shoe needed, such as a neutral shoe or a shoe with motion control features.
Part 1: How Do Foot and Shoe Anatomy and Function Affect Shoe Fit?
How Do Foot and Shoe Anatomy and Function Affect Shoe Fit?
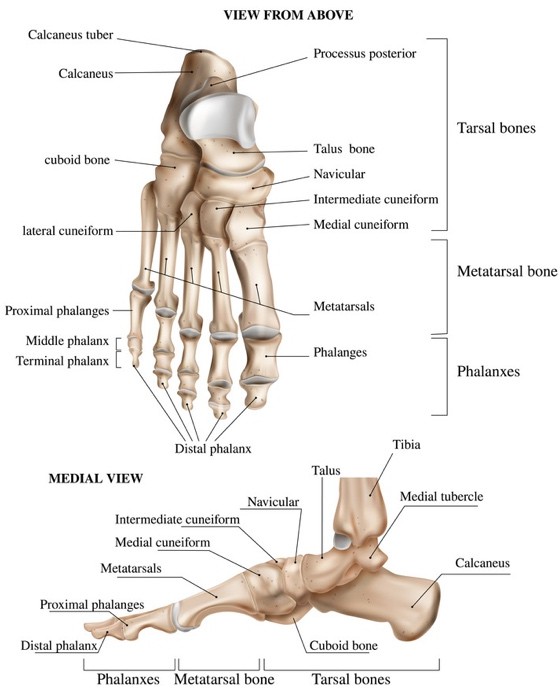
What Foot Anatomy Matters for Shoe Fitting?
The foot has 28 bones, including the 2 sesamoid bones that act as a fulcrum for the big toe, enabling us to propel forward. There are 31 joints/articulations. The navicular bone is a keystone for the arch of the foot and is important for shoe fitting because it landmarks the medial longitudinal arch. The navicular tuberosity is used to measure the height differential of the medial longitudinal arch during weight bearing and non-weight bearing.
What Common Foot Conditions Affect Shoe Fit?
Morton's Toes: The 2nd toe is longer than the 1st toe, making the foot longer.
Changes the forces through the foot and decreases the stability of the foot tripod, driving the foot medially.
Bunions: Enlarged knuckle of the big toe, usually seen in over-pronators.
Signifies a long-standing foot stability problem.
Hammer Toes: Flexion deformity of the digits.
Increased flexion of the distal joints leads to increased flexor digitorum longus (FDL) tone.
Can cause the plantar fat to slip forward and the intrinsic foot muscles to weaken.
Why Does Rear Foot Angle Matter for Shoe Fit?
You need to examine the Rear Foot Angle: how the calcaneus reacts with the ground in weight bearing. It should be neutral to 4 degrees everted.
The impact on shoe fit: excessive rearfoot eversion indicates over pronation, therefore a shoe with motion control features is needed.
How Do Genu Valgus and Genu Varus (Knee Alignment) Affect Shoe Fit?
Genu Valgus ("Knocked Knees") is where the Q angle is greater than normal. The normal Q angle is between 10-15 degrees.
The impact on shoe fit:
The greater the valgus angle, the more the foot needs to supinate (motion control shoe).
May need orthotics or varus posting insides.
Genu Varus ("Bowed Leg") is where the Q angle is smaller than normal or a negative Q angle.
The impact on shoe fit:
Usually, the individual has a high arched foot.
The greater the varus angle, the more the foot needs to pronate and come in contact with the ground (neutral shoe).
What Are the Common Foot Motions, Including Pronation and Supination?
Inversion: Bringing the medial or inferior surface of the foot toward the midline.
Eversion: Bringing the lateral or inferior surface of the foot away from the midline.
Plantar Flexion: Bringing the inferior surface of the foot downward.
Dorsiflexion: Bringing the inferior surface of the foot upward.
Abduction: Approximating the anterior and posterior portions of the lateral aspect of the foot.
Adduction: Approximating the anterior and posterior portions of the medial aspect of the foot.
Pronation: Dorsiflexion + Eversion + Abduction
It is important to know where this motion occurs in the foot (e.g. forefoot, mid-foot, rear foot).
An increase in pronation usually occurs on the side of the longer leg (supination occurs on the short leg).
Can occur in the forefoot, mid-foot, or rear foot as well.
Why Does Big Toe Range of Motion (Hallux Dorsiflexion) Matter for Toe-Off?
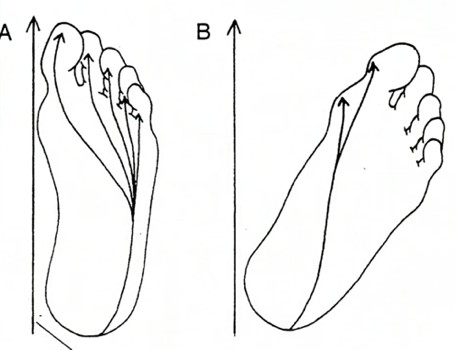
Normal hallux dorsiflexion is 65 degrees. The big toe must have at least 40 degrees of dorsiflexion in a weight bearing position, which is important for toe off.
If hallux dorsiflexion is less than 40 degrees:
Stride length decreases.
You may experience pain at the 1st MTP joint.
It tightens the plantar fascia, causing the foot to be a rigid lever, and can lead to plantar fasciitis.
Impact on shoe fit:
Forefoot cushioning
Rocker toe
Motion control features
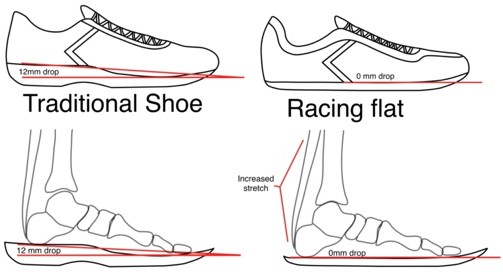
Less "drop" (the difference in height of heel and toe)
Associated gait abnormalities:
Shortened stride length on that side
Reduced hip extension and glute strength on that side
Premature calf engagement
Foot turned out (progression angle: the position of the foot when the individual is walking)
Avoidance of that foot, especially in propulsion
Lean to the side with the most motion available
What Are Tibial Torsion and Tibia Varum?
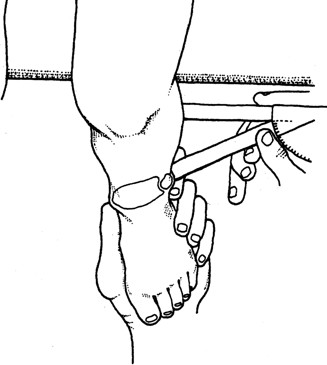
Tibial Torsion: how much the tibia is externally rotated (ER) as we develop (adults: 22 degrees).
Determines progression angle.
Measured by the transmalleolar angle.
Internal Tibial Torsion: knees pointed forward and the foot points to the inside.
External Tibial Torsion: knees pointed forward and the foot points to the outside.
Tibia Varum: the amount of bowing at the tibia.
An increase will cause the foot to pronate through a greater range of motion.
Impact on shoe fit: be careful with a motion control shoe, as it will tip the individual more to the outside and create more pressure on the lateral side of the foot.
How Much Calcaneal Movement and Ankle Movement Is Needed?
Calcaneal Movement (ideally 20 degrees inversion; 10 degrees eversion)
The calcaneus must be able to evert at least 4-8 degrees to allow the subtalar joint to pronate at heel strike.
Ankle Movement (plantar flexion 15 degrees; dorsiflexion 35 degrees)
Important for heel strike and heel lift.
In gait, a minimum of 10 degrees of dorsiflexion is needed prior to heel lift. Limited dorsiflexion can cause metatarsal pain.
Measuring Transmalleolar Angle
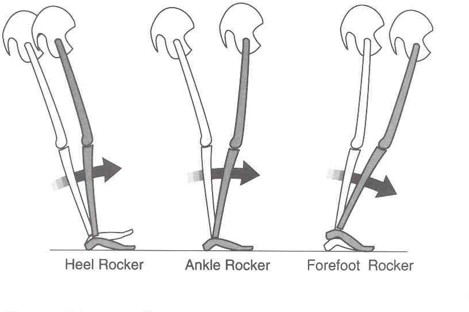
What Are the 3 Rockers of Gait?
Heel rocker (calcaneus)
Ankle rocker (ankle joint)
Forefoot rocker (MTP joint)
Three Types of Rockers
How Do the Foot Posture Index and the Gait Guys System Compare?
Foot Posture Index (FPI)
Given a score of -2 to +2:
A larger score = a more flexible/pronated foot.
A smaller score = a less flexible/supinated foot.
The six FPI criteria:
Talar head palpation
Supra and infra lateral malleolar curvature
Calcaneal frontal plane position
Prominence in the region of the subtalar joint
Congruence of the medial longitudinal arch
Abduction/adduction of the forefoot on the rearfoot
Gait Guys System
Foot volume
Foot anatomy
Foot morphology (abnormalities, foot type)
Hallux ROM
Navicular differential
Rearfoot flexibility
Forefoot flexibility
Leg morphology
Brannock Measurement
What Are the Parameters for Normal Gait?
In standing, the lower leg should be perpendicular to the ground. If not, it will change the characteristic of how the hip and knee hit the ground.
With the subtalar joint in neutral, the bisection of the calcaneus should be parallel to the vertical bisection of the tibia and fibula.
The distal metatarsal heads should form a smooth parabolic curve (transverse metatarsal arches).
Osseous and ligamentous joint integrity should protect against excessive or pathomechanical motions.
Pronation = more laxity
Supination = more rigid
Part 2: How Is Shoe Fit Tested? Shoe Fit Functional Testing
What Are the 9 Tests Essential to Shoe Fit?
1. Foot Type Determination
The individual kneels, and you observe by looking down from the calcaneus.
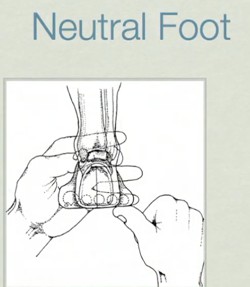
Palpate the 2 sides of the talus, then press gently up on the lateral side of the foot at the 5th metatarsal until the joints lock. Note the relationship of the rearfoot and forefoot.
The different foot types:
Neutral Foot
Rearfoot and forefoot are on the same plane, with no relative inversion or eversion, a straight lower limb ideally, and balanced foot progression.
Fit = neutral shoe
Neutral Foot
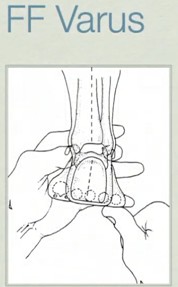
Forefoot Varus
The forefoot is inverted, with pronation throughout forefoot load and into toe off, insufficient supination and toe off, a compromised medial tripod, increased FHL use, and an internal-external rotation limb challenge.
Forefoot Varus
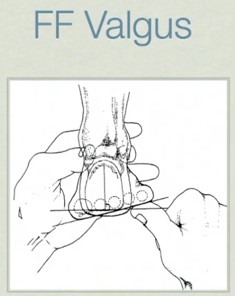
Forefoot Valgus
The forefoot is everted, often seen with a high arched cavus foot. There is little pronation, a supinated lateral tripod compromise (hammertoes), and an internal-external rotation limb challenge.
Forefoot Valgus
Rearfoot Varus
An anatomical problem with an inverted rearfoot, often with a bowed tibia. Excessive pronation is necessary, just like forefoot varus, with an over supinated toe off and an internal-external limb challenge.
Rearfoot Varus
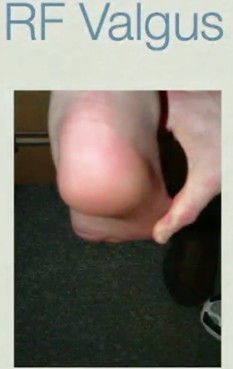
Rearfoot Valgus
Harder to control, with an everted foot, mid-foot/arch collapse, an insufficient foot tripod, a poor lever for toe off and propulsion, and excessive internal rotation of the limb.
Rearfoot Valgus
2. Arch Height Differential (Length Splay, Done in Sitting)
Indicates flexibility or rigidity of the arch, especially the medial longitudinal arch.
Impact on shoe fit:
Gives an idea of the longitudinal and latitudinal splay.
May indicate the need for a motion control shoe.
3. Hallux ROM (Done in Standing)
First, the client stands on 1 leg, raises their heels off the ground and goes onto their toes. Measure hallux ROM with a goniometer (it needs to be 40 degrees for walking).
Second, the client stands on 1 leg and the therapist lifts the big toe and measures ROM.
Impact on shoe fit: the less extension, the more need for a forefoot rocker shoe.
4. Calcaneal Motion Test (Inversion/Eversion, Done in Sitting)
The individual is seated. The therapist grasps the lower leg with one hand to stabilize it, and with the other hand grasps the calcaneus and moves it into inversion and eversion.
The calcaneus needs to have at least 4-8 degrees of eversion.
Impact on shoe fit:
Less rearfoot motion = less rigid shoe
More rearfoot motion = more rigid shoe
5. Forefoot Motion Test (Done in Sitting)
The individual is seated. The therapist grasps the calcaneus to stabilize it and with the other hand grasps the forefoot.
Impact on shoe fit:
Less motion = more rigid shoe
More motion = less rigid shoe
6. Ankle Rocker Test (Done in Standing)
The individual stands and leans forward at the ankles without lifting the heel. Measure ankle ROM with a goniometer (>30 degrees).
This gives an estimate of ankle dorsiflexion and whether premature heel rise is occurring.
7. Knee Position Test (Done in Standing)
First, have the individual stand and point their feet forward (this can be repeated in sitting), and observe the position of the knees.
Second, with the individual standing, ask them to bend their knees.
If the knees go IN = External tibial torsion → less neutral shoe, semi curved last, more motion control features.
If the knees go OUT = Internal tibial torsion → more neutral shoe, less curved last, minimal motion control features.
8. Observe Foot Volume
Observe the foot arch (high, average, or low) in standing.
9. Brannock Measurement
Have the individual place their foot firmly into the heel cup and stand with all their weight on that foot.
Measure heel to toe length.
To measure arch length:
Place a finger on the ball joint of the big toe.
Slide the pointer forward so the inside curve fits the ball joint of the foot with the middle rib.
Part 3: How Do You Choose Appropriate Footwear for the Professional?
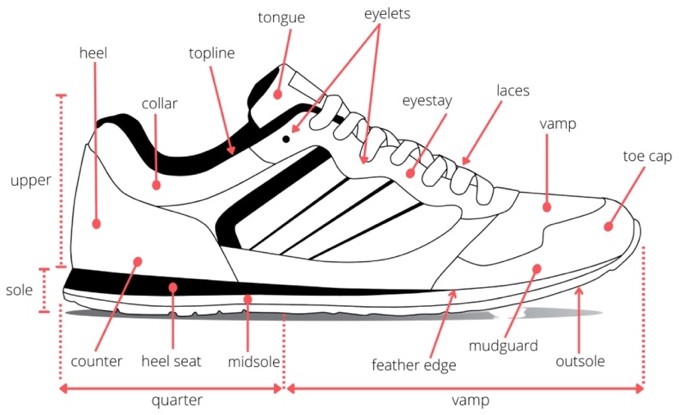
What Are the Parts of a Shoe? Shoe Anatomy Explained
Shoe Anatomy
The Sole: the part of the shoe that comes in contact with the ground.
Made of rubber, it provides some degree of shock absorption and traction.
Crash Zone: where heel strike occurs.
The heel is supposed to strike the ground at approximately 16 degrees, starting laterally to the toes.
Crash Zone
Rocker: a drop put into the front portion of the shoe to ease walking and assist toe off.
Flares: a widening of the sole, particularly lateral, which can be important for stability on uneven surfaces.
Lateral flare: provides extra stability on heel strike, but can speed up the rate of pronation.
Medial flare: helps to prevent over-pronation as the foot comes into mid-stance.
Drop: the differential height between the heel and the forefoot.
Pronation = the foot becomes a more mobile adaptor.
Supination = the foot becomes a more rigid lever.
If the heel is higher than the forefoot = more rigid.
Example of “Drop”
Midsole: in between the sole and the upper, it accommodates the load imposed on it and the load transfer from the ground to the person.
Dual Density midsole: one side of the midsole is softer than the other side (usually laterally). It absorbs force and decreases the velocity of pronation at heel strike and mid-stance.
Shank: the stiff area of the shoe between the heel and the transverse tarsal joint. It corresponds to the medial longitudinal arch of the foot and provides torsional rigidity to the shoe (limits pronation and motion at the subtalar and mid tarsal joints).
Last: the form or mold the shoe is made on.
Shape of the shoe:
Straight
Semi Curved
Curve
Types of last:
Board: Very stiff, with a piece of cardboard or fiber overlying the shank and sole. Very effective for motion control, but can be uncomfortable for somebody who does not have that problem.
Slip: Made like a slipper, it allows great amounts of flexibility, which can be better for people with a rigid foot.
Combination: A board lasted heel and a slip lasted front portion.
When evaluating the shoe, bisect the heel and draw an imaginary line along the sole. The shoe line should pass between the 2nd and 3rd metatarsal.
Upper: the sides and top of the shoe.
Heel Counter (part of the upper): important for motion control.
Lateral counter (helps support the calcaneus): provides the foot something to give resistance against.
Heel Pocket: the back portion of the midsole where the upper portion comes down (hugging the Achilles tendon).
A deep heel pocket helps to limit the motion of the calcaneus and also allows space for an orthotic.
Toe Box: the widest portion of the shoe (it needs to prevent crowding and pressure on the metatarsal heads).
Excessive pressure can result in bunions and/or hammertoes.
Insole: the removable inner footbed.
What Are the 9 Steps to Proper Shoe Fit?
Determine the usage of the shoe.
Ask and observe if they have problems with their feet, knees, or hips.
Perform a foot evaluation while they are sitting and standing. Watch them walk.
Determine foot type.
Measure the foot with a Brannock device.
Determine the flexibility of the foot.
Choose good socks.
Use proper lacing tips.
Test the shoe for fit and function.
Need Help With Shoe Fit or Foot Concerns?
If foot, knee, or hip concerns are affecting your movement or the shoes you can wear, Pain Free Health Clinic can help you explore appropriate care options.
Our physiotherapy team can assess your concerns, discuss possible contributing factors, and recommend suitable treatment based on your individual needs.
You can also visit our online booking page to explore available appointments.
Coming soon: Our future Maple Ridge and Newton locations are not yet open.
Learn More About Pain Free Health Clinic
Follow Pain Free Health Clinic on YouTube, Instagram, Facebook, and TikTok for more educational content on shoe fit, foot health, physiotherapy, rehabilitation, mobility, and movement health.